

Post by pickles on Aug 9, 2013 19:47:19 GMT -5
Pickles' DIY Dalek Dress and Accessories:
You don’t have to do things exactly as I did. I am just posting so others can see one way of going about it. If you have any suggestions or ideas to do something differently or improve on a method then please share! Also, if my descriptions/instructions are not clear to you then feel free to ask for clarification.
I’ll start with a list of what was used for this project:
Thrift Store
Fabricland
Claire’s (accessory store)
Canadian Tire (home improvement store)
Dollar Store
Home Depot
Beginners note: Always make sure you let primer and paint coats dry completely before adding the next or you will end up with discoloured, runny, lumpy, textured paint jobs that look terrible. Hair dryers can help dry if you are in a hurry (just remember the foam balls will go flying if you are not careful). Drying takes much longer if the air is cold/damp.
Balls/Orbs
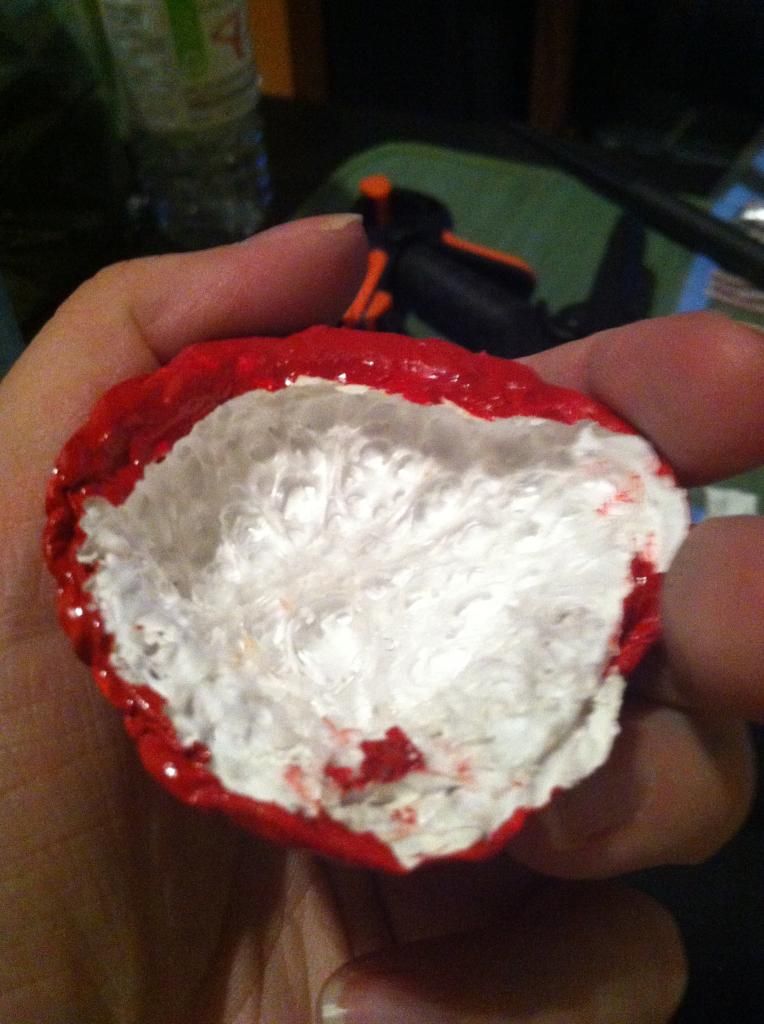
Step 1. Cut the foam balls in half. I used a slightly serrated knife (no huge teeth). Be super careful when you do this as it is quite easy to remove a few digits if you’re not. I pressed the blade in along the seam until I was comfortable sawing the rest of the way through. Sawing makes the surface more flat which will help when you glue the Velcro to it.
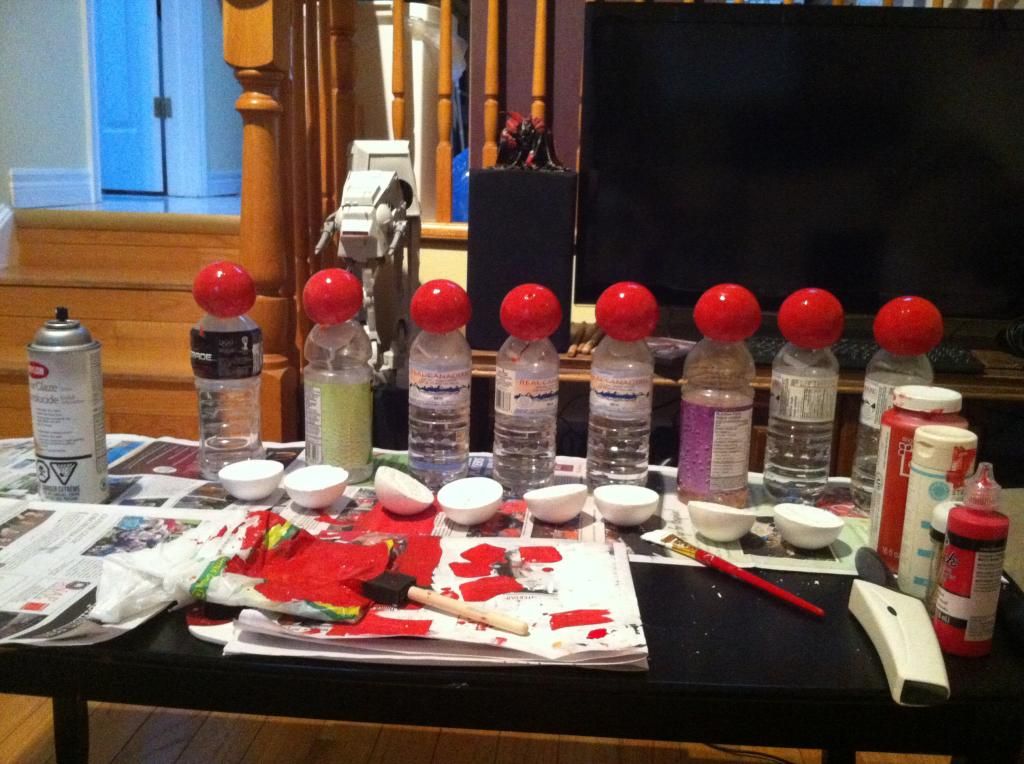
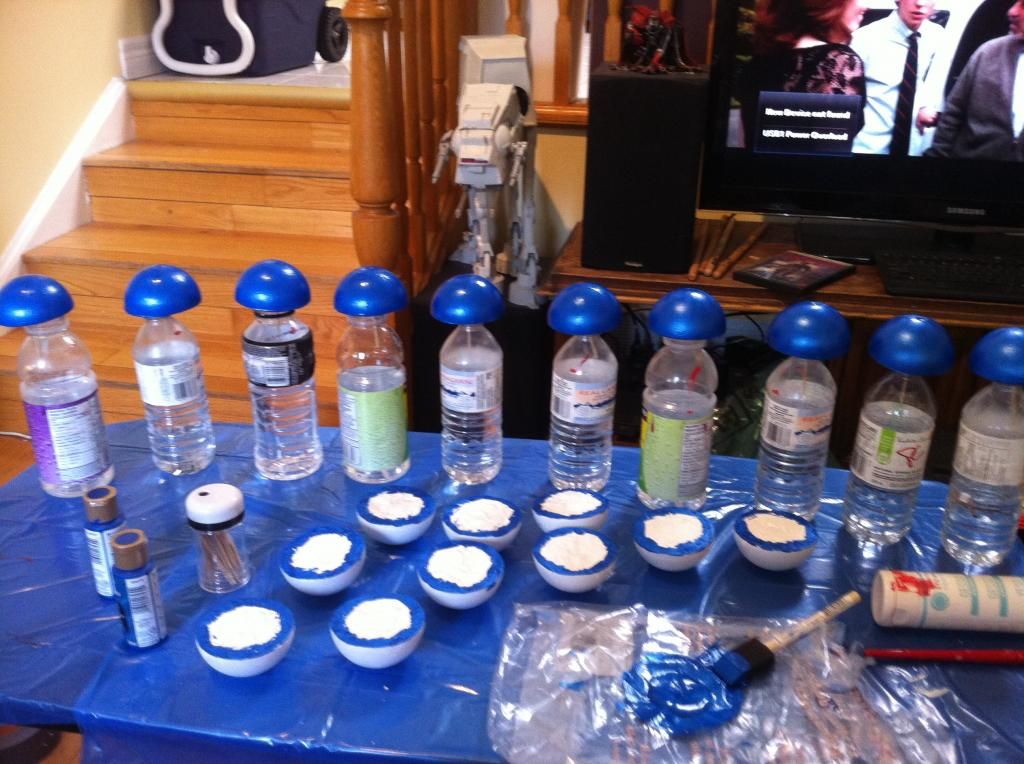
Step 2. Stick a toothpick or two into the middle of the flat part of the ball and put a layer of gesso primer on it (Do not use the spray paint primer or it will melt the foam balls). Then you can either set it upright on the toothpick and have it rest slightly on an edge or you can use a water/pop bottle to rest it on. Make sure the bottle is at least half full of water to stabilize it.
Step 3. When the ball is completely dry, apply a layer of paint. Ideally you want to do several thin layers. Repeat this step for at least 2-3 layers of paint.
Step 4. When ball is completely dry then spray the clear gloss over it. You may need more than one layer.
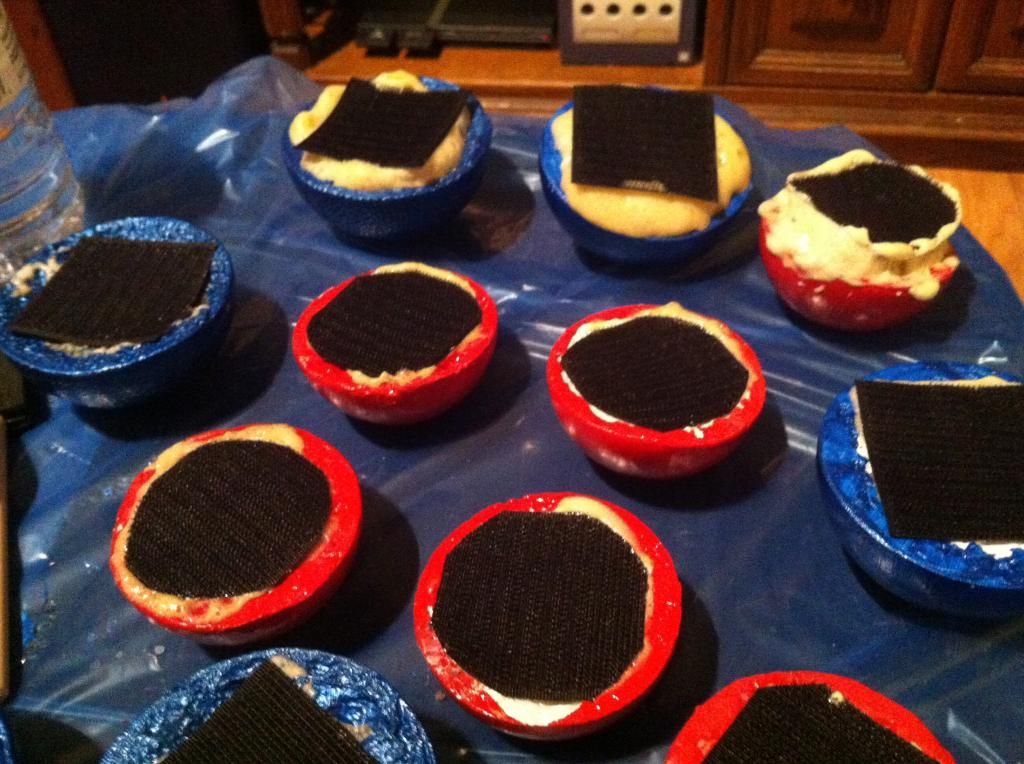
Step 5. While waiting for the balls to dry you can cut out your Velcro circles. Measure 2” x 2” squares and cut the corners to make circles. While you do this, you can also take off the top of the solar light and trace the circumference of the end with the solar panels on it and cut it out of the Velcro for each one.
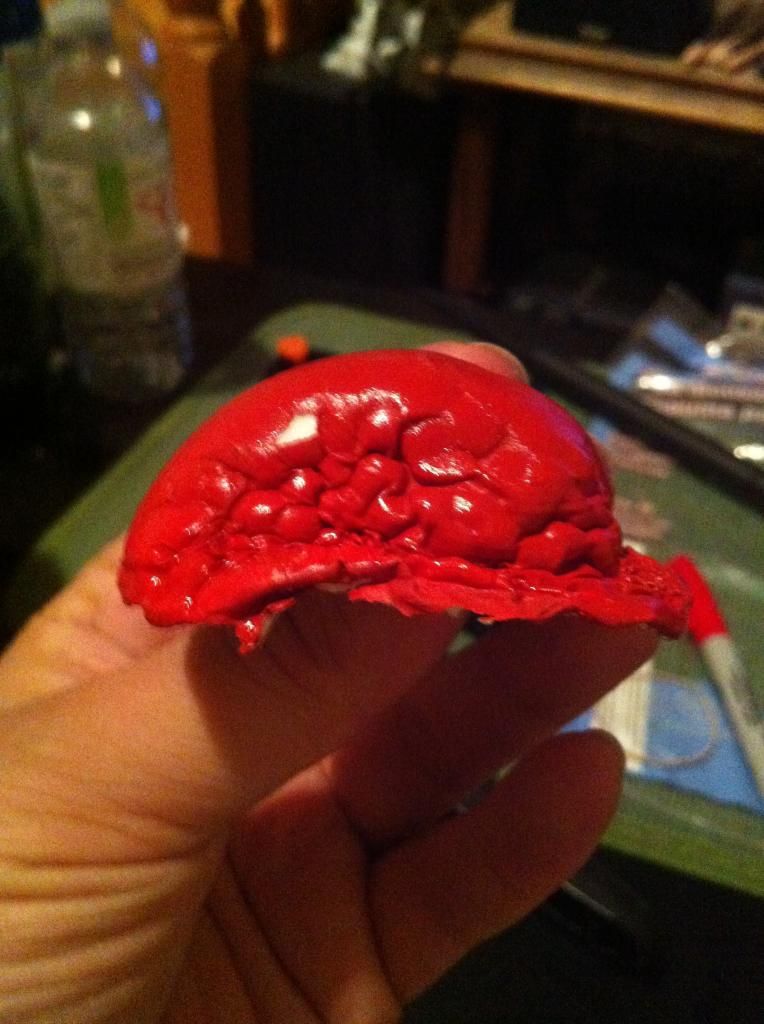
Step 6. Glue the Velcro circles to the balls with the gorilla glue (NOT E6000! Or your balls will melt). Use enough glue to make sure the Velcro will stick but not too much that it oozes out the sides and makes a mess. Gorilla glue expands like nobody's business. See pics below of some of my failures. My preference is to glue the rough hook side to the ball so the dress has the softer loop side attached to it (making it less likely to catch on other garments in the wash) but you can do what you want! You can set the balls Velcro side up in sets of 4 and use something to press the Velcro down. I used some of my old electrical texts books.
Dress
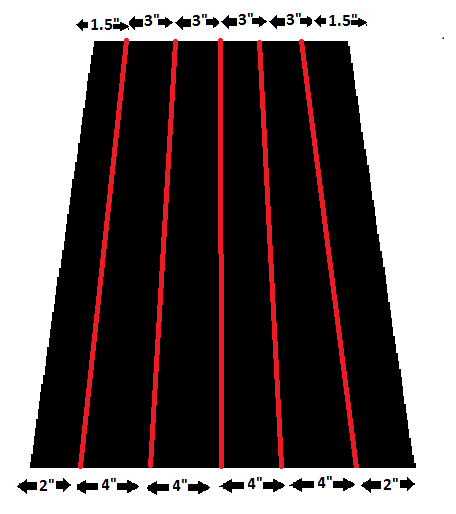
Step 1. Lay the dress flat on a table with either the front facing up or the back. You want the creases at the sides. Measure the length of the bottom and make a mark at the center. I used a dot of the fabric paint to mark it. If you do that, make sure not to accidentally touch it like I did… a few times, haha. Take half the length of your original measurement and divide by 5. That is the number that you will use to make your next marks. From the mid-point, measure the length of the 1/5 and make a mark there. Repeat that from the mark you just made and then do the same on the other side. You will end up with 5 marks on the bottom. Then do the same thing at the waist.
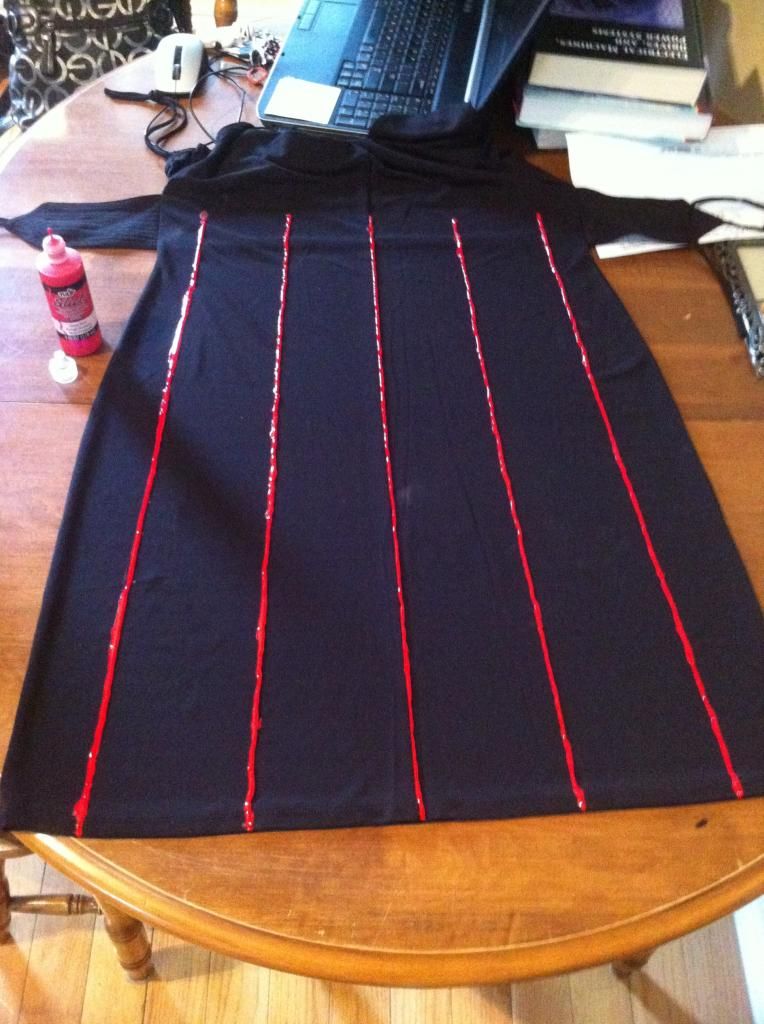
Step 2. Line up the marks (I used the same measuring tape as a guide) and draw a line connecting the marks vertically. See the picture below. You may want to use some kind of solid ruler or maybe a broom handle or some such. Using the flexible tape measure set me up with some jagged, uneven and messy lines. It looks ok at a distance so I am moderately happy with it. Or if you are super skilled at free handing it then go for it!
Step 3. When the fabric paint is dry on the one side (aprox 4 hours dry time) then flip the dress over and do the same. When it is complete you will have a total of 10 panels.
Step 4. Place the orbs on the dress to your liking. 4 to a panel as you know. Mark the dress where you want the orbs so you can sew on the other side of the Velcro. When you’re done marking, get to sewing!
Step 5. TBD – still working on that part!
Headgear
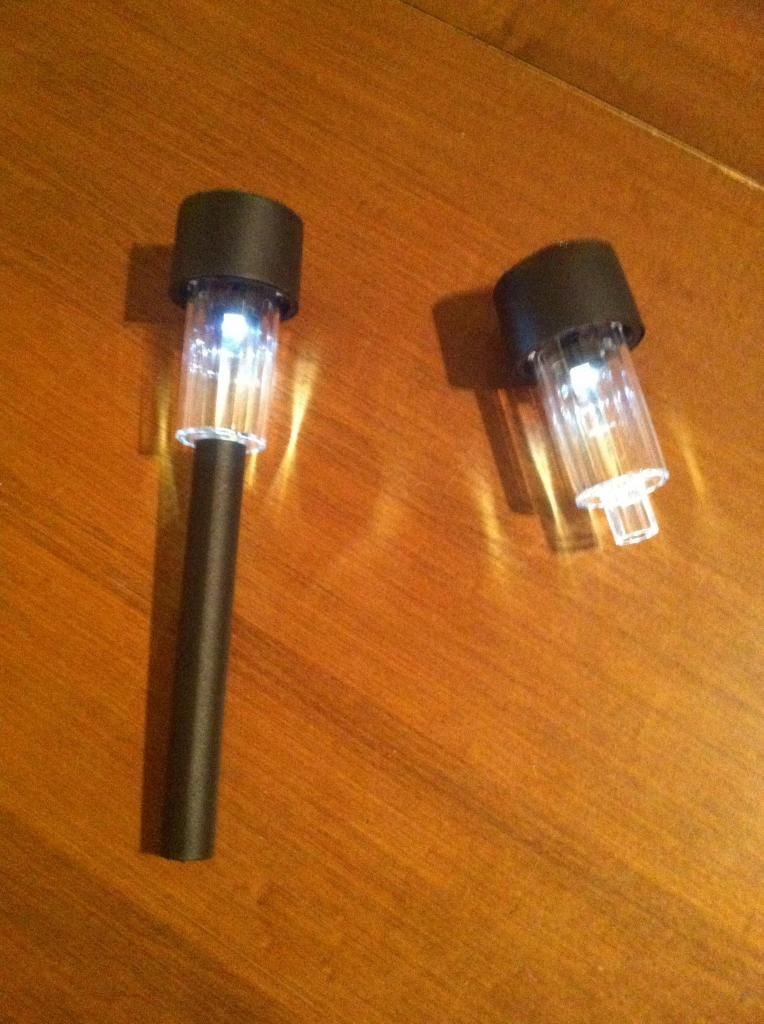
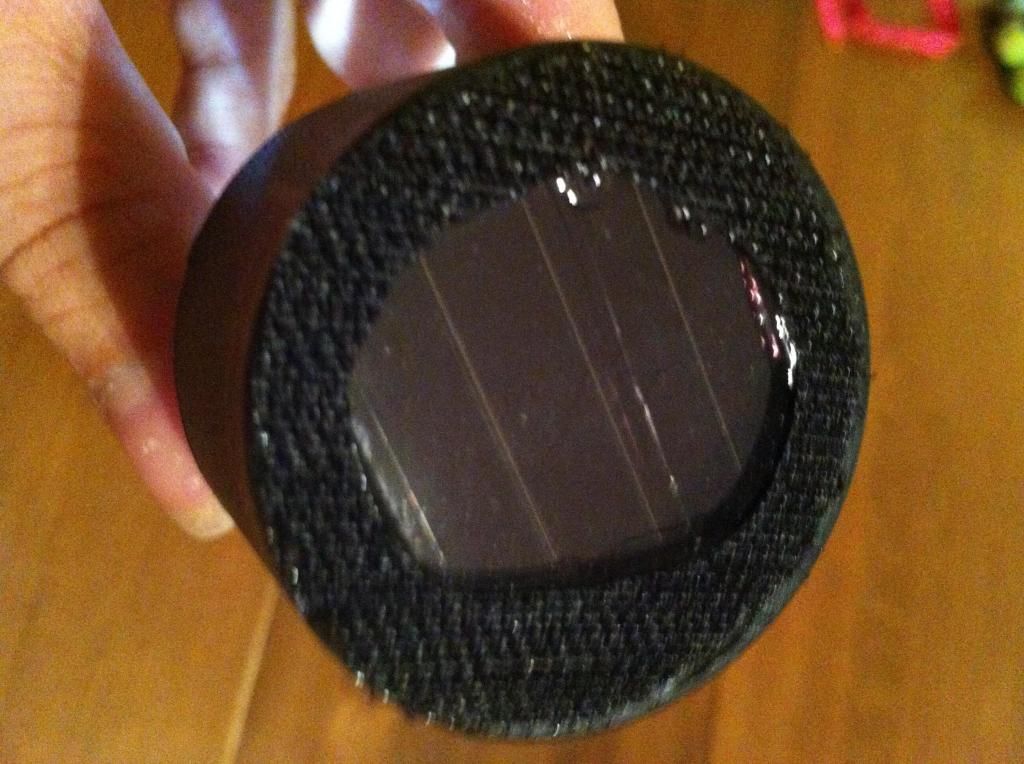
Step 1. Take the Velcro circles you cut out for the two head lights and make sure the two halves are separated, you only need 1 side (I prefer the hook side). Fold it in half and cut out the middle so the Velcro is in the shape of a ring. I do this because you are going to attach the Velcro ring to the solar panel end of the light and now you can still charge the light. Use the E6000 to glue the Velcro ring to the light.
Step 2. Use the E6000 to glue the soft Velcro side to the headband. I placed the edges of the soft side of the Velcro circle an inch from the mid-point on either side. You can place them as close together or apart as you like. It is a good idea to clamp down anything that you glue. I have an assortment of plastic clamps from Home Depot that I use for a lot of my costume building. I think they were on sale for $6? You could also use earth magnets or whatever is handy to clamp the pieces as the glue dries.
Step 3. Take one of the blind spot mirrors and peel of the protective liner to expose the adhesive pad. Take the stem from the solar light (remove the spike attachment that comes with it) and center an end on the adhesive pad. Reinforce the bond with some E6000 along the circumference of the stem. Let that sit to dry (mirror side down so the glue doesn’t run all over the place).
Step 4. When the stem/mirror glue is dry you are ready to attach it to the headband. Make sure you have something available to clamp the stem to the headband. Use the E6000 again to make a line across the headband, dead center at the top of the headband. Use enough so that it will adhere the stem and the headband but don’t go super crazy or it will ooze everywhere. Clamp that down and let it dry upside down so that gravity brings the glue around the stem.
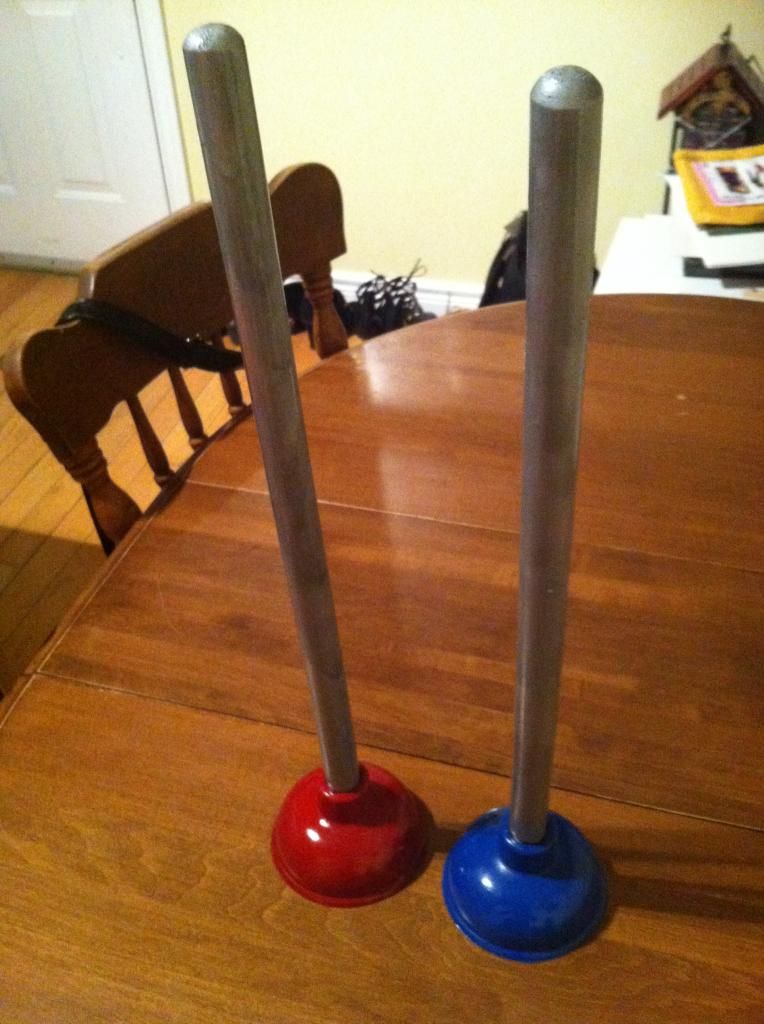
Plunger
This is totally optional – you don’t need to paint your plunger but I did so the whole outfit is coordinated.
Step 1. I used duct tape to cover the rubber part as I primed and spray painted the handle. I used a metallic silver paint for the handle. Let that dry completely then use the clear gloss spray paint for added shine. It also helps protect the metallic finish so it doesn’t rub off with use.
Step 2. With the handle completely dry, separate it from the rubber part and take off the duct tape. Then spray the rubber with the special plastic spray paint. Do not use the primer or the paint will chip when the rubber flexes. Do a couple coats both inside and out, making sure to let each coat dry completely in between.
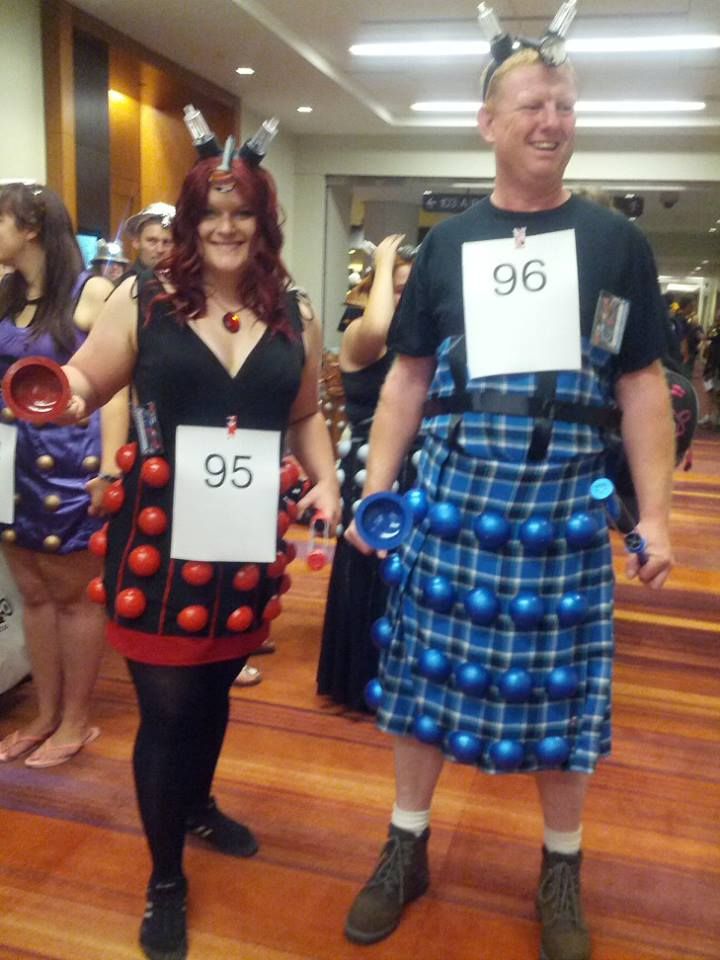
Rob and myself with our official record numbers!
I was a little sad that I forgot my heeled boots for the outfit and we ran out of time to paint his face Braveheart-Style!
You don’t have to do things exactly as I did. I am just posting so others can see one way of going about it. If you have any suggestions or ideas to do something differently or improve on a method then please share! Also, if my descriptions/instructions are not clear to you then feel free to ask for clarification.
I’ll start with a list of what was used for this project:
Thrift Store
- 1 Dress $10.00 I can sew but I decided to do this last minute so buying the dress was a time saver.
- 4 packages of 2 ½ inch foam balls (6 per pack) $7.00 each I chose the firm/smooth balls (what she said) and not the softer ones that are more textured.
- 1 bottle of acrylic gesso primer $10.00 Optional but recommended to primer the foam balls. It also helps reduce any texture the ball may have.
- 1 bottle of acrylic paint (16oz) $7.00 To colour your balls! Get 2 or 3 if they are small bottles. There was more than enough paint with the 16oz bottle. You probably only need 4-6 oz.
- Couple paint brushes $ 6.00 There was a mixed brush pack on sale that I picked up.
- 1 bottle Tulip fabric paint $7.00 Used to draw detail lines on the dress.
- 1 can of clear high gloss spray paint. $11.00 Optional but recommended to make your balls shiny!
Fabricland
- 2 ½ meters of the non-adhesive 2” black Velcro. $20.00 ($10.00 with fabricland card.) Make sure you get both the hook and loop sides. For the 40 balls you only need just over 2 meters but it never hurts to have a little extra. Plus you need some for the head lights.
Claire’s (accessory store)
- One 2” headband $6.00 You may be able to find cheaper but you need 2”. Mine happened to be black fabric covered. Plastic should work fine also.
Canadian Tire (home improvement store)
- 1 plunger $? I picked up the little plunger head with a regular length handle. You can use whatever kind you want.
- 2 can of spray paint (one colour for plunger head and one colour for plunger handle) $? Optional but recommended if you want to color the plunger. For the plunger head - make sure it is the paint for plastic as it will be flexible and not chip. You could check Walmart too – it may or may not be cheaper.
- 1 can of spray paint primer $? Optional but recommended to prime the plunger handle.
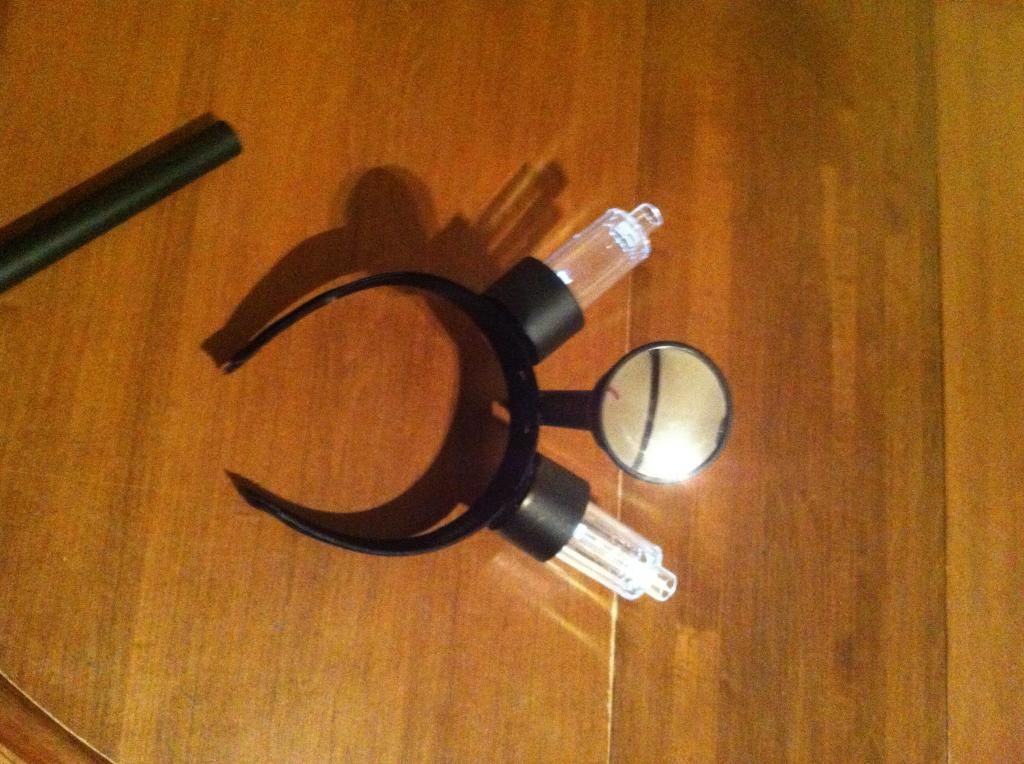
- 2 small solar lights for your yard $3 each They serve double duty with the light end and the stem end. I’d recommend getting a couple back-ups just in case.
- 1 pack of ‘blind spot’ car side mirror attachments $3 Comes in a pack of two. I picked up the swivel ones because they were the same cost as the static ones. Who doesn’t like a little swivel for free?
Dollar Store
- 1 whisk $1.50
- Pack of toothpicks $1.00 If you don’t have some already. You’ll probably want to get a bunch.
- Duct tape $1.50 Optional but recommended for painting the plunger.3
Home Depot
- E6000 Glue $6.00 You can pick this up at Michael's too but it’s more expensive there.
- Gorilla Glue (8oz) $16 You can’t use E6000 on the foam balls or it will melt. It even melted through the gesso primer layer when I tried. You probably don’t need the 8oz bottle but that’s what I used.
Beginners note: Always make sure you let primer and paint coats dry completely before adding the next or you will end up with discoloured, runny, lumpy, textured paint jobs that look terrible. Hair dryers can help dry if you are in a hurry (just remember the foam balls will go flying if you are not careful). Drying takes much longer if the air is cold/damp.
Balls/Orbs
Step 1. Cut the foam balls in half. I used a slightly serrated knife (no huge teeth). Be super careful when you do this as it is quite easy to remove a few digits if you’re not. I pressed the blade in along the seam until I was comfortable sawing the rest of the way through. Sawing makes the surface more flat which will help when you glue the Velcro to it.
Step 2. Stick a toothpick or two into the middle of the flat part of the ball and put a layer of gesso primer on it (Do not use the spray paint primer or it will melt the foam balls). Then you can either set it upright on the toothpick and have it rest slightly on an edge or you can use a water/pop bottle to rest it on. Make sure the bottle is at least half full of water to stabilize it.
Step 3. When the ball is completely dry, apply a layer of paint. Ideally you want to do several thin layers. Repeat this step for at least 2-3 layers of paint.
Step 4. When ball is completely dry then spray the clear gloss over it. You may need more than one layer.
Step 5. While waiting for the balls to dry you can cut out your Velcro circles. Measure 2” x 2” squares and cut the corners to make circles. While you do this, you can also take off the top of the solar light and trace the circumference of the end with the solar panels on it and cut it out of the Velcro for each one.
Step 6. Glue the Velcro circles to the balls with the gorilla glue (NOT E6000! Or your balls will melt). Use enough glue to make sure the Velcro will stick but not too much that it oozes out the sides and makes a mess. Gorilla glue expands like nobody's business. See pics below of some of my failures. My preference is to glue the rough hook side to the ball so the dress has the softer loop side attached to it (making it less likely to catch on other garments in the wash) but you can do what you want! You can set the balls Velcro side up in sets of 4 and use something to press the Velcro down. I used some of my old electrical texts books.
Dress
Step 1. Lay the dress flat on a table with either the front facing up or the back. You want the creases at the sides. Measure the length of the bottom and make a mark at the center. I used a dot of the fabric paint to mark it. If you do that, make sure not to accidentally touch it like I did… a few times, haha. Take half the length of your original measurement and divide by 5. That is the number that you will use to make your next marks. From the mid-point, measure the length of the 1/5 and make a mark there. Repeat that from the mark you just made and then do the same on the other side. You will end up with 5 marks on the bottom. Then do the same thing at the waist.
Step 2. Line up the marks (I used the same measuring tape as a guide) and draw a line connecting the marks vertically. See the picture below. You may want to use some kind of solid ruler or maybe a broom handle or some such. Using the flexible tape measure set me up with some jagged, uneven and messy lines. It looks ok at a distance so I am moderately happy with it. Or if you are super skilled at free handing it then go for it!
Step 3. When the fabric paint is dry on the one side (aprox 4 hours dry time) then flip the dress over and do the same. When it is complete you will have a total of 10 panels.
Step 4. Place the orbs on the dress to your liking. 4 to a panel as you know. Mark the dress where you want the orbs so you can sew on the other side of the Velcro. When you’re done marking, get to sewing!
Step 5. TBD – still working on that part!
Headgear
Step 1. Take the Velcro circles you cut out for the two head lights and make sure the two halves are separated, you only need 1 side (I prefer the hook side). Fold it in half and cut out the middle so the Velcro is in the shape of a ring. I do this because you are going to attach the Velcro ring to the solar panel end of the light and now you can still charge the light. Use the E6000 to glue the Velcro ring to the light.
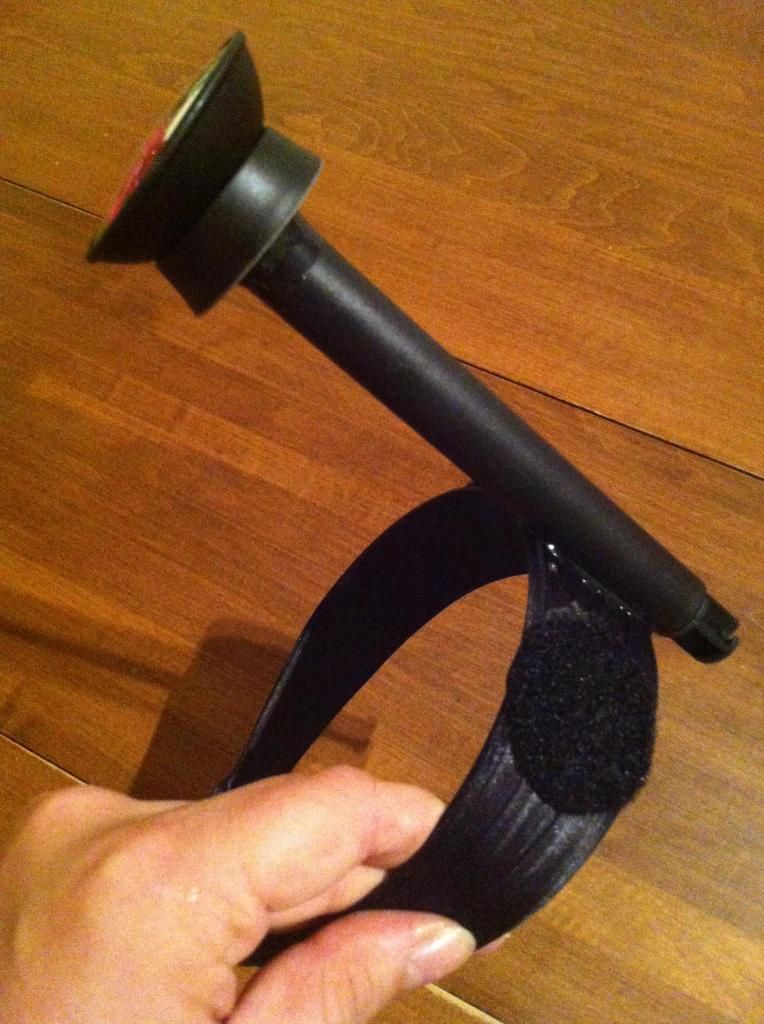
Step 2. Use the E6000 to glue the soft Velcro side to the headband. I placed the edges of the soft side of the Velcro circle an inch from the mid-point on either side. You can place them as close together or apart as you like. It is a good idea to clamp down anything that you glue. I have an assortment of plastic clamps from Home Depot that I use for a lot of my costume building. I think they were on sale for $6? You could also use earth magnets or whatever is handy to clamp the pieces as the glue dries.
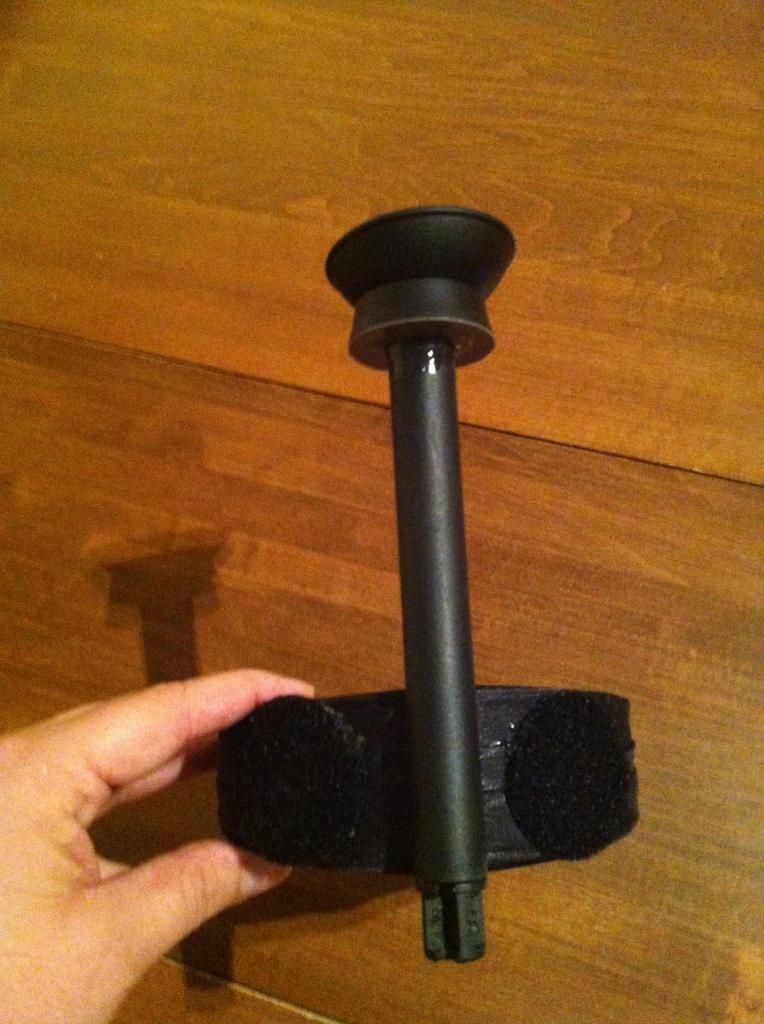
Step 3. Take one of the blind spot mirrors and peel of the protective liner to expose the adhesive pad. Take the stem from the solar light (remove the spike attachment that comes with it) and center an end on the adhesive pad. Reinforce the bond with some E6000 along the circumference of the stem. Let that sit to dry (mirror side down so the glue doesn’t run all over the place).
Step 4. When the stem/mirror glue is dry you are ready to attach it to the headband. Make sure you have something available to clamp the stem to the headband. Use the E6000 again to make a line across the headband, dead center at the top of the headband. Use enough so that it will adhere the stem and the headband but don’t go super crazy or it will ooze everywhere. Clamp that down and let it dry upside down so that gravity brings the glue around the stem.
Plunger
This is totally optional – you don’t need to paint your plunger but I did so the whole outfit is coordinated.
Step 1. I used duct tape to cover the rubber part as I primed and spray painted the handle. I used a metallic silver paint for the handle. Let that dry completely then use the clear gloss spray paint for added shine. It also helps protect the metallic finish so it doesn’t rub off with use.
Step 2. With the handle completely dry, separate it from the rubber part and take off the duct tape. Then spray the rubber with the special plastic spray paint. Do not use the primer or the paint will chip when the rubber flexes. Do a couple coats both inside and out, making sure to let each coat dry completely in between.
Rob and myself with our official record numbers!

I was a little sad that I forgot my heeled boots for the outfit and we ran out of time to paint his face Braveheart-Style!


